Managing multiple tracking plugins with Beetle Tracking
When you install and activate Beetle Tracking, it’s important to ensure that only one tracking system is collecting your website data. Duplicate tracking can lead to inaccurate reporting and performance issues. This guide walks you through best practices and step-by-step instructions to streamline your tracking setup.
Watch our short video guide or scroll past it to follow the written guide below.
Why disable other tracking plugins?
- Prevent Duplicate Data: Running multiple tracking systems for the same pixel can lead to inflated conversion numbers and skewed analytics.
- Improve Site Performance: Fewer scripts running means faster page load times and a better user experience.
- Simplify Management: Centralizing your tracking setup through Beetle Tracking makes it easier to update or troubleshoot issues.
Step-by-Step Setup Guide
1. Prepare for Migration
- Audit Existing Plugins: Make a list of all plugins that add tracking pixels (e.g., Facebook Pixel, Google for WooCommerce, TikTok Pixel).
- Backup Your Site: Before making any changes, back up your website to ensure you can revert if needed.
Don’t have a backup solutions? We recommend using Updraft.
2. Install and Activate Beetle Tracking
- Download and Install: Get the latest version of Beetle Tracking from the WordPress plugin directory here: Download
- Activate the Plugin: Activate Beetle Tracking from your WordPress admin dashboard.
- Connect Your Pixels: Follow the on-screen instructions to connect your Facebook, Google, TikTok, or any other pixels directly in Beetle Tracking.
3. Disable Duplicate Tracking
- Review Plugin Settings: For each tracking plugin (Google for WooCommerce, Facebook, TikTok, etc.):
- Check if there’s an option to disable tracking while keeping other features (like catalog synchronization) active.
- Disable Tracking Scripts: If the plugin does not allow selective disabling, deactivate or uninstall the plugin to avoid duplicate tracking.
- Confirm Changes: After making changes, use your browser’s developer tools or a tag management solution to ensure that only Beetle Tracking is firing the necessary pixels.
4. Test Your Setup
- Use Pixel Helper Tools: Tools like Facebook Pixel Helper or similar browser extensions can help verify that only your intended pixels are active.
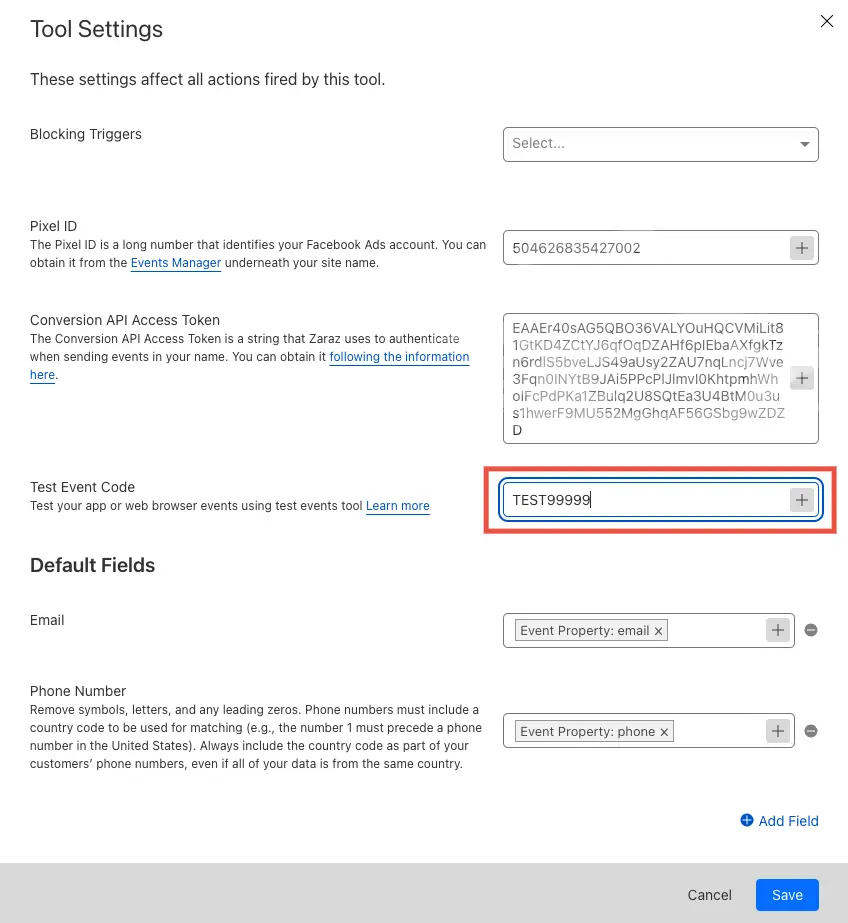
- Add your Meta “test_event_code” directly to your Meta tracking action on your Cloudflare account.

- Monitor Analytics: Ensure that your analytics data is accurate and not inflated due to duplicate tracking.
Best Practices
- Centralize Management: Use Beetle Tracking as your sole interface for pixel management. This minimizes complexity and reduces the risk of errors.
- Regular Audits: Periodically review your site’s tracking setup, especially after adding new plugins or making major updates.
- Keep Documentation Updated: Maintain clear internal documentation on your tracking setup for future reference and troubleshooting.
Troubleshooting
- No Data Appearing: Verify that the correct pixels are connected in Beetle Tracking and that duplicate plugins are fully disabled.
- Conflicting Features: If you need features from another plugin (like catalog synchronization), check that only the non-tracking parts of the plugin are active.
- Unexpected Behavior: Clear your cache and test in an incognito window. If problems persist, contact our support team with your detailed setup for further assistance.
Frequently Asked Questions
Yes, you can often disable just the tracking component while retaining catalog features. Review the plugin’s settings or contact their support if needed
Double-check that all other tracking plugins are either disabled or have their tracking features turned off. If issues persist, please reach out to our support team for a closer look.
Disabling the duplicate tracking features will not affect the core functionalities (like catalog synchronization) if configured correctly. Always backup your site before making changes.
Since Beetle Tracking uses server-side tracking via Cloudflare, traditional pixel or tag helper tools will not detect it. This means that if these tools are showing any tracking activity, it’s a clear indicator that old tracking scripts are still running on your website. To ensure a clean setup and avoid duplicate tracking, follow these steps:
- Use Helper Tools as a Diagnostic: If you detect pixel activity with browser extensions (like Facebook Pixel Helper), it’s likely coming from legacy scripts.
- Audit Your Plugins and Code: Check all installed plugins, theme files (especially header/footer sections), and any custom code to identify and remove any outdated tracking implementations.
- Consult Plugin Settings: Some plugins might offer an option to disable tracking without affecting other features. Make sure tracking components are fully disabled if you need to keep catalog or other functionalities active.
- Re-test After Cleanup: Once you’ve removed the old scripts, use your helper tools again to verify that only Beetle Tracking is active (keeping in mind that it won’t show up in these tools due to its server-side nature).
By following these steps, you can ensure that only Beetle Tracking is handling your website data, maintaining accurate analytics and optimal site performance.